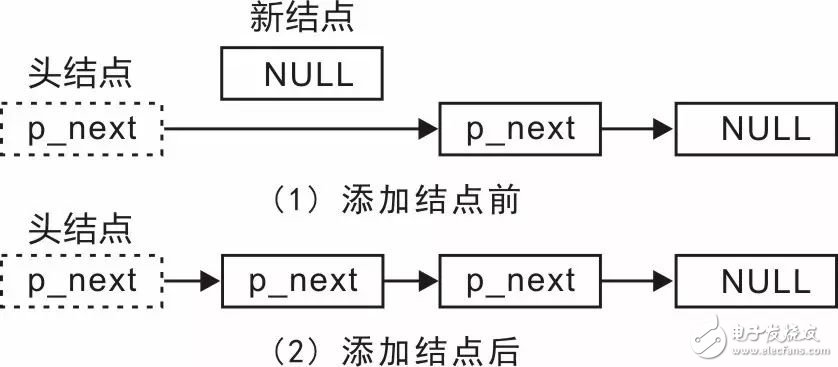
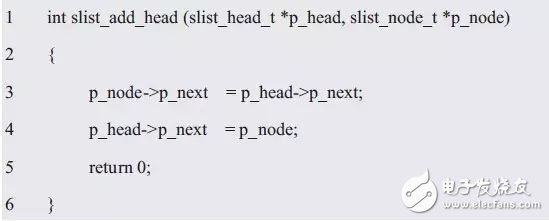
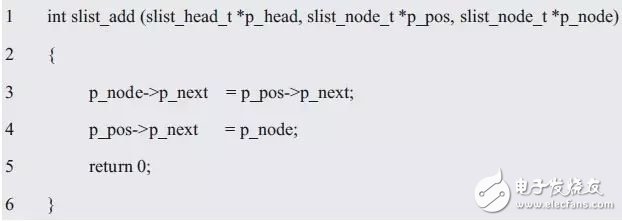
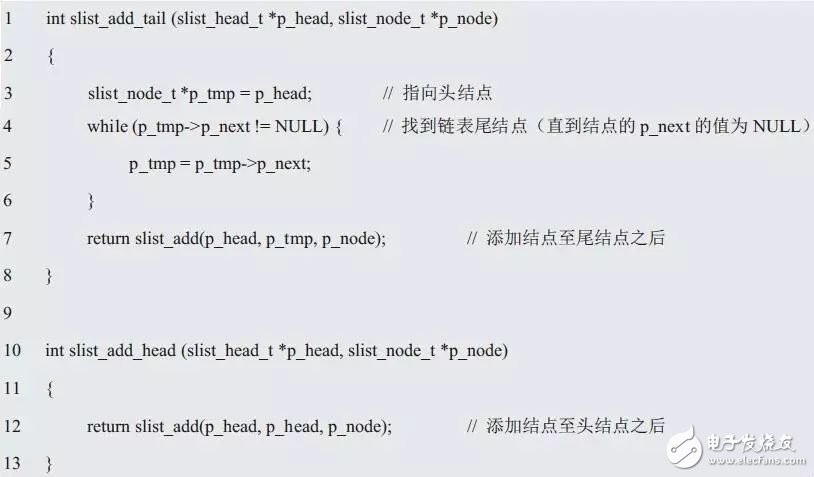
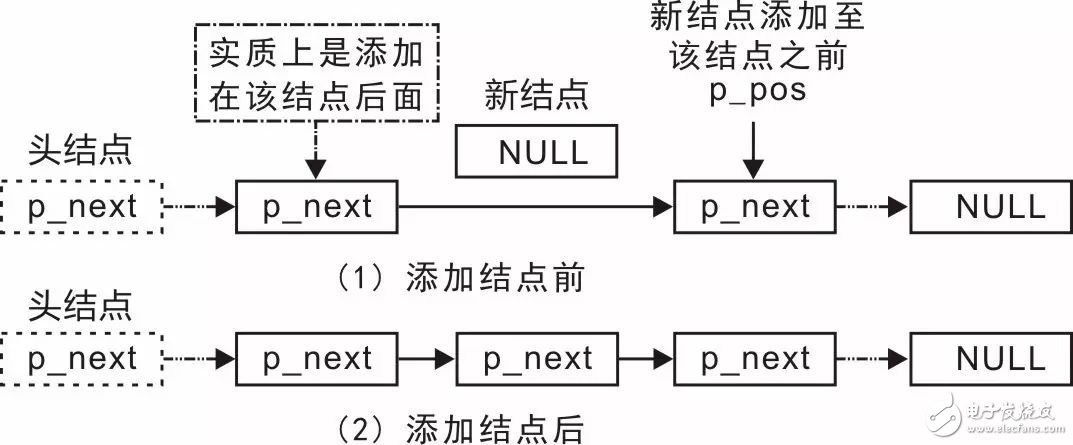
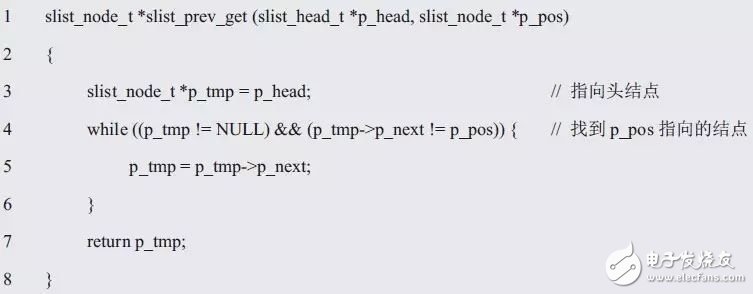
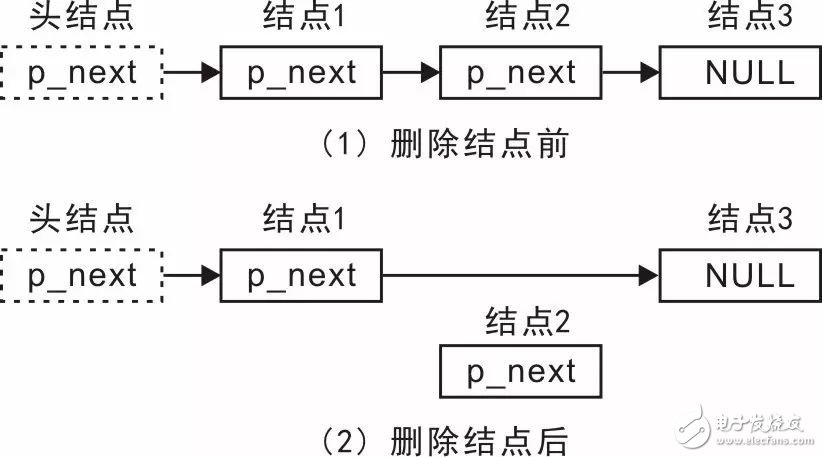
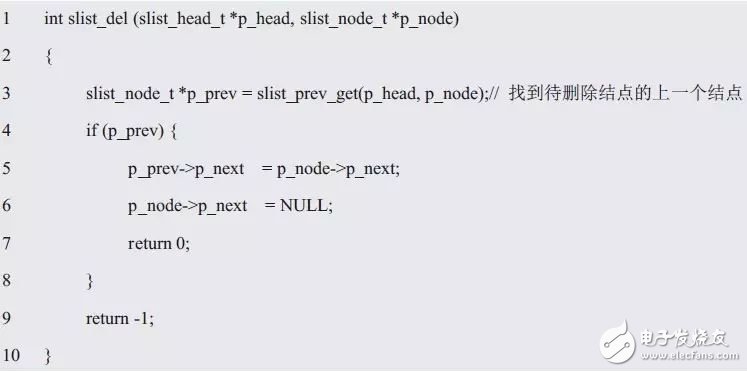
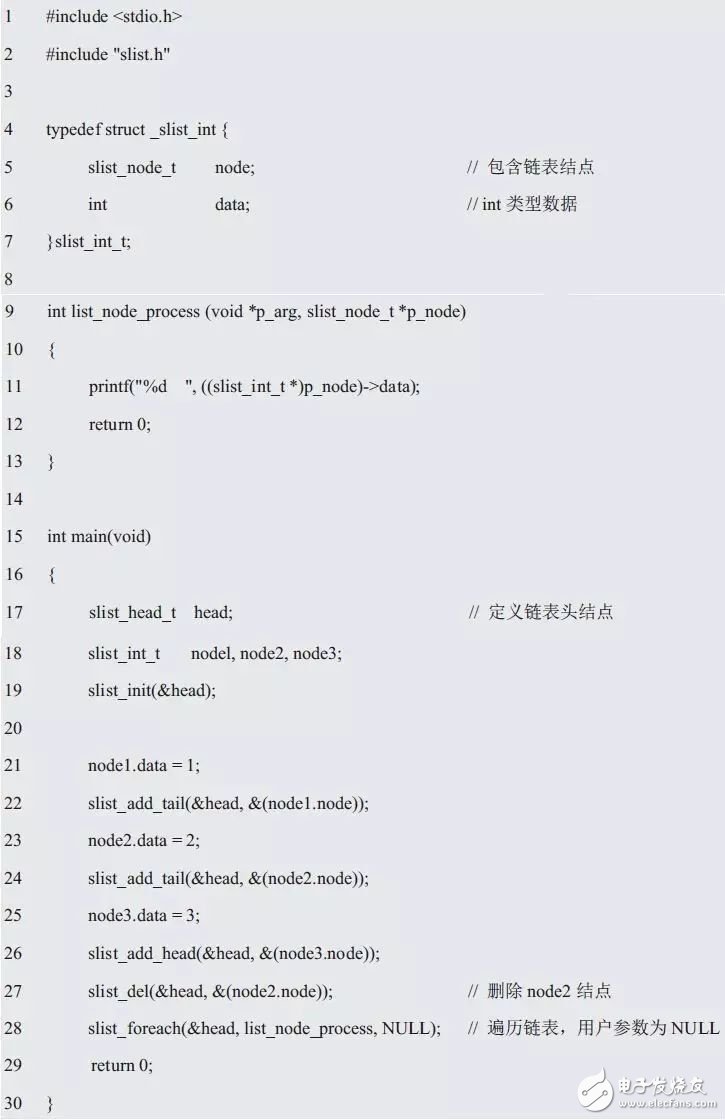
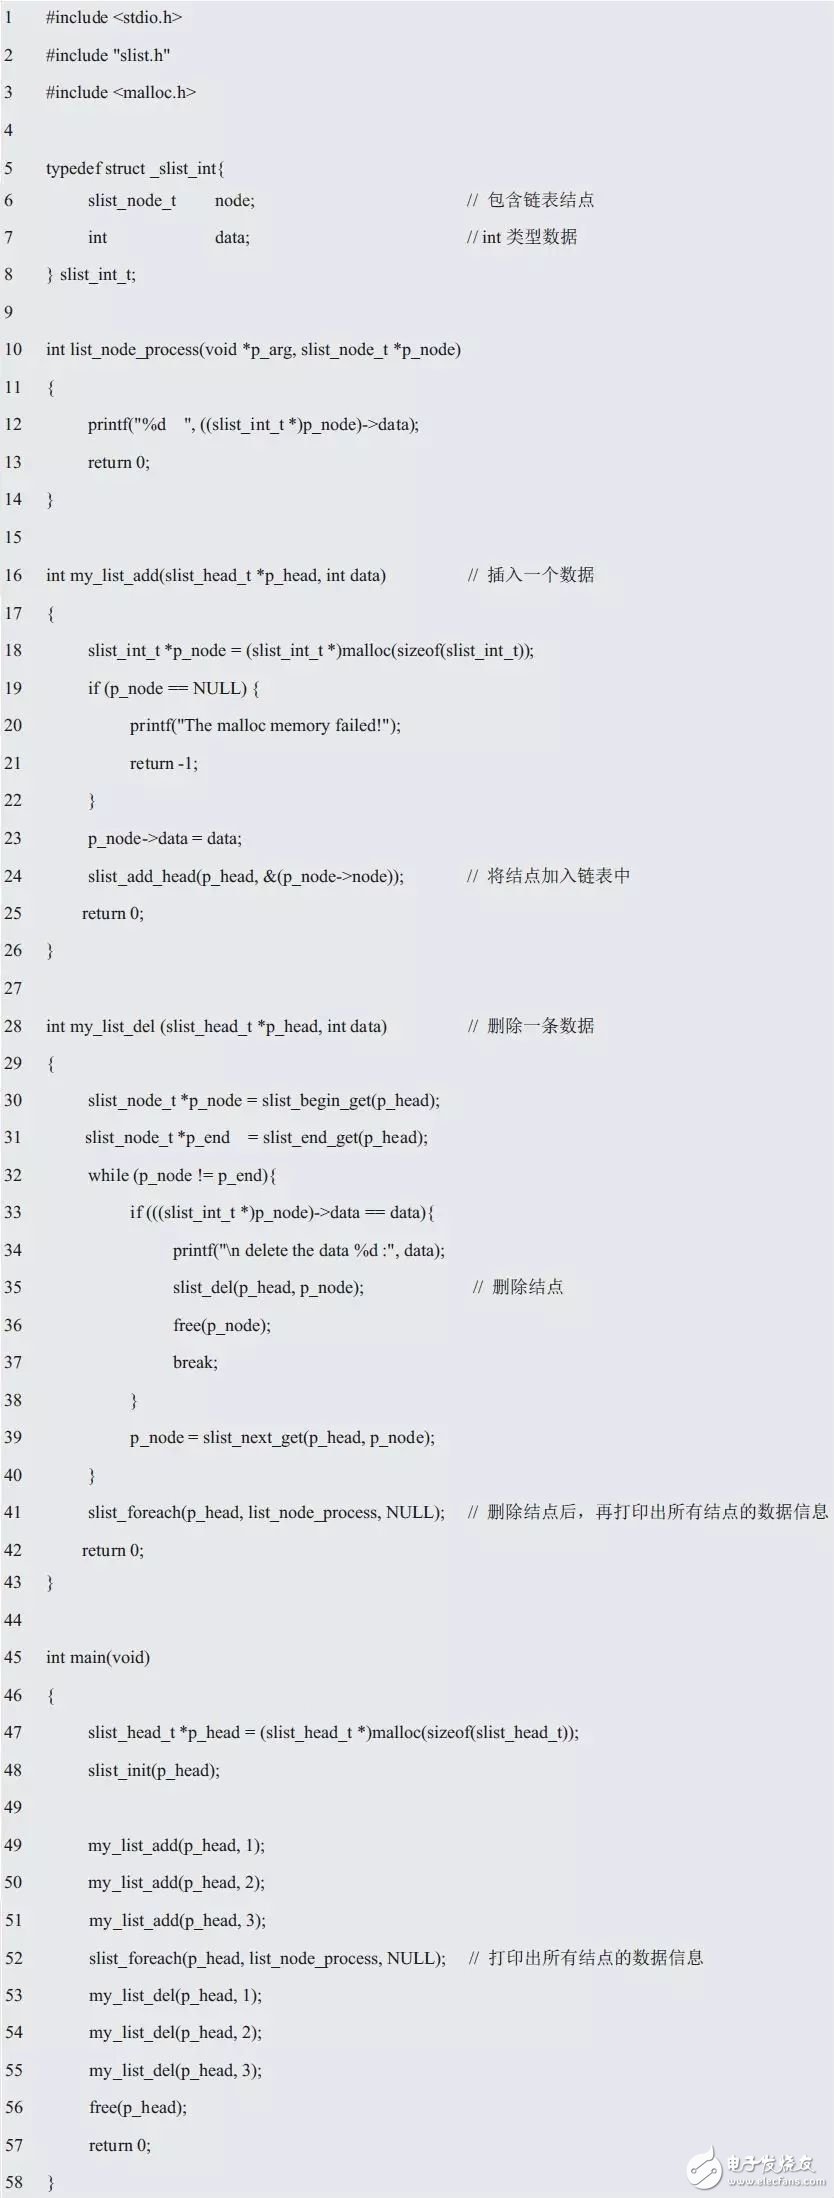
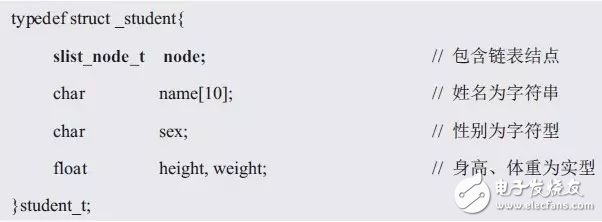
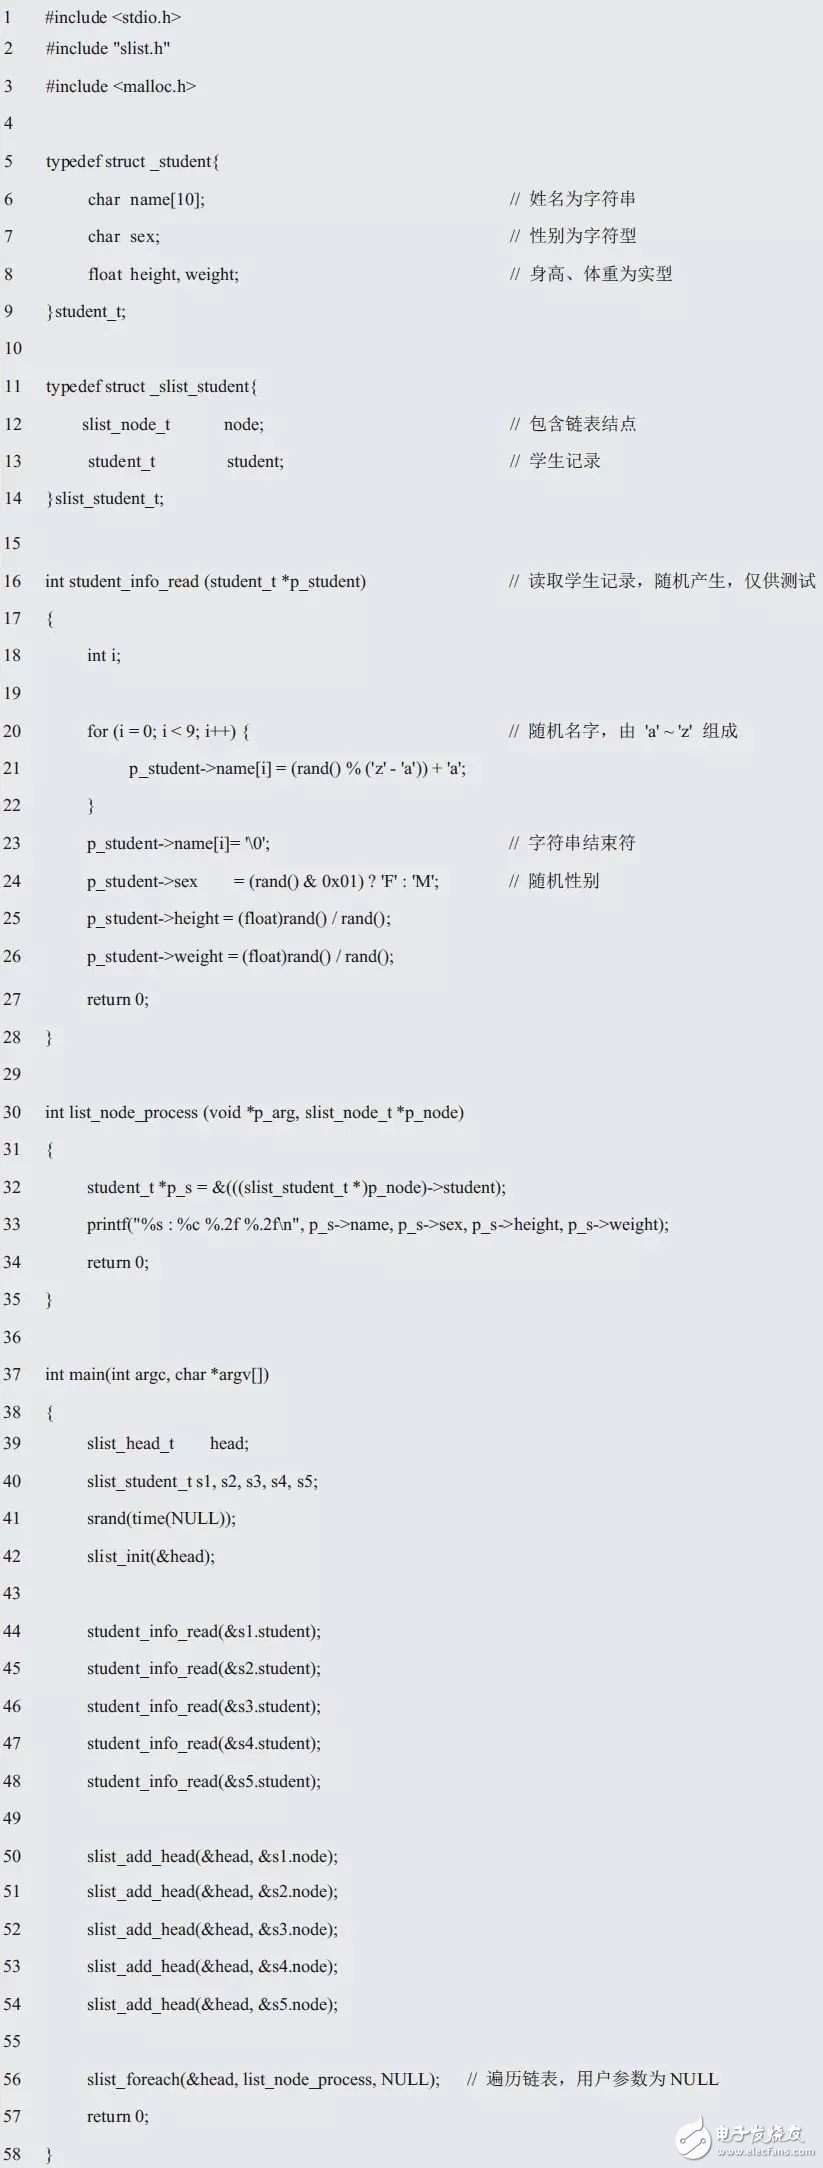
Professor Zhou Ligong's years of hard work "Programming and Data Structure" and "Programming for AMetal Framework and Interface (I)", after the publication of the book content, set off a learning boom in the electronics industry. Authorized by Professor Zhou Ligong, this public number has serialized the contents of the book "Programming and Data Structure" and is willing to share it. The third chapter is the algorithm and data structure. This article is the 3.2.3 interface. > > > 3.2.3 Interface In actual use, it is not enough to add these interface functions to the end of the linked list and traverse the linked list. For example, in the node add function, it is only according to people's habits, the node is added to the end of the linked list, so that the added node is behind the first added node. When writing a function, knowing that adding a node to the tail implementation process requires modifying the p_next value in the end of the original list header and changing it from NULL to a pointer to the new node. Although the operation is simple, the premise of performing this operation is to find the tail node of the linked list before adding the node. You need to start from the p_head pointer to the head node and traverse each node in turn until the p_next value in the node is found. Until NULL (tail node). As you can imagine, the efficiency of adding a node will gradually decrease as the length of the list increases. If the list is long, the efficiency will be very low, because the list will be traversed each time before adding a node. Since adding a node to the end of the list will result in inefficiency due to the need to find the tail node, why not change the idea and add the node to the head of the list. Since there is a p_head pointer pointing to the head node in the linked list, the head node can be used for use, and no need to look for it, the efficiency will be greatly improved. When adding a node to the head of the list, the changes in the list are shown in Figure 3.11. Figure 3.11 Add a node to the list header In the implementation process, you need to complete the modification of two pointers: (1) modify p_next in the new node to point to the node pointed to by p_next in the head node; (2) modify the p_next of the head node to make it Point to the new node. Compared with the process of adding a node to the tail of the linked list, it is no longer necessary to find the process of the tail node. No matter how long the linked list is, the addition of the node can be completed through these two steps. The function prototype (slist.h) that adds the node to the head of the list is: Among them, p_head points to the link header node, p_node is the node to be added, and its implementation is shown in Listing 3.21. Listing 3.21 Adding a sample program to the linked list header It can be seen that the procedure of inserting the node to the head of the linked list is very simple, no need to find and high efficiency, so in actual use, if there is no requirement for the position, it is preferred to add the node to the head of the linked list. Modify one line of code in Listing 3.20 as a test, for example, change line 26 to: Add node3 to the list header to see what happens to the modified final output. Since it is possible to add nodes to the head and tail, why not be more flexible, providing an interface function that takes the node to any position? When the node is added to the node pointed to by p_pos, the change of the linked list is shown in Figure 3.12. Figure 3.12 Adding a Node to an Arbitrary Location In its implementation, you need to modify two pointers: (1) modify p_next in the new node to point to p_pos to point to the next node of the node; (2) modify p_pos to point to the node's p_next, point it to New node. You can add nodes through these two steps, and add the function prototype (slist.h) from the node to any position in the list as: Among them, p_head points to the link header node, p_node points to the node to be added, p_pos points to the node to indicate the location of the new node, and the new node is added after the node pointed to by p_pos. For details, see Listing 3.22. . Listing 3.22 Adding a sample program to any location anywhere in the linked list Although this function does not use the parameter p_head when it is implemented, the p_head parameter is passed in, because the p_head parameter will be used when implementing other functions, for example, to determine if p_pos is in the linked list. As you can see from the previous introduction, it is very inefficient to add the node directly to the end of the list. After adding the node to the function at any position, if you add the node to the last added node every time. It is also possible to add a node to the end of the list. See Listing 3.23 for details. Listing 3.23 Sample program for managing int data Obviously, adding a node to the head and tail of the list is just a special case of adding a node to any position: Add a node to the head of the list, that is, after adding the node to the head node; Add a node to the end of the list, after adding the node to the end of the list. The implementation of the slist_add_head() function and the slist_add_tail() function is detailed in Listing 3.24. Listing 3.24. Adding nodes to the head and tail based on slist_add() If you want to add a node before a node? In fact, before adding a node to a node, it is just a kind of deformation after adding a node to a node, that is, adding to the back of the node before the node, as shown in Figure 3.13. Figure 3.13 Schematic diagram of adding a node to any position Obviously, as long as you get the precursor of a node, you can use the slist_add() function to add a node to the front of a node. To do this, you need to provide a function that gets a node's predecessor, whose function prototype (slist.h) is: Where p_head points to the link header node, and the node pointed to by p_pos indicates the location of the lookup node. The return value is p_pos pointing to the previous node of the node. Since there is no pointer to the previous node in the node of the singly linked list, only the traversal of the linked list is started from the head node. When a node's p_next points to the current node, it indicates that it is the current node. For a node, the function implementation is detailed in Listing 3.25. Listing 3.25. Sample program for obtaining a node predecessor It can be seen that if the value of p_pos is NULL, then when a node's p_next is NULL, it will return, and the returned node is actually the tail node. For the convenience of the user, you can simply wrap a function that finds the tail node. The function prototype is: The function implementation is detailed in Listing 3.26. Listing 3.26 Finding the End Node Since the tail node can be obtained directly through the function, when it is necessary to add the node to the end of the linked list, there is no need to find the tail node by itself. The implementation of modifying the slist_add_tail() function is shown in Listing 3.27. Listing 3.27 Finding the End Node Corresponding to adding a node, you can also delete a node from the linked list. Assuming that there are already 3 nodes in the linked list, and now you want to delete the intermediate nodes, the changes in the linked list before and after the deletion are shown in Figure 3.14. Figure 3.14 Schematic diagram of deleting nodes Obviously, deleting a node also requires modifying the values ​​of the two pointers: you need to modify the p_next of its previous node to point to the next node of the node to be deleted, and also set the p_next of the deleted node to NULL. . The function prototype (slist.h) that deletes the node is: Among them, p_head points to the link header node, p_node is the node to be deleted, and the implementation of the slist_del() function is shown in Listing 3.28. Listing 3.28: Deleting a Node Sample Program For ease of reference, the contents of the slist.h file are shown as shown in Listing 3.29. Listing 3.29 slist.h file contents The integrated sample procedure is detailed in Listing 3.30. Listing 3.30 Integrated Sample Program All the nodes in the program are defined in terms of static memory allocation. That is, the memory occupied by each node has been allocated before the program runs, but the difference is that dynamic memory allocation needs to use malloc at runtime. ) and other functions to complete the allocation of memory. Since there is no memory leak in static memory, and after the compilation is completed, the memory of each node is already allocated, no need to spend time to allocate memory, and no additional processing code for memory allocation failure. Therefore, in embedded systems, static memory allocation is often used. But its fatal shortcoming is that it can't release memory. Sometimes users want to release their occupied memory when deleting the nodes of the linked list, which requires dynamic memory allocation. In fact, the core code of the linked list is only responsible for the operation of the linked list, only need to pass the address of the node (p_node), the linked list program does not care about where the memory of the node comes from. Based on this, to achieve dynamic memory allocation, just use the dynamic memory allocation function such as malloc() in the application. See Listing 3.31 for details. Listing 3.31 Integrated sample program (using dynamic memory) If you use a linked list to manage student records, as an example of int data, you need to add a linked list node data to the student record. such as: Although this definition allows student information to be managed using a linked list, there is a serious problem because modifying the definition of the student record type affects all program modules that use the record structure type. In practical applications, student records can be managed in a linked list or in an array. When using array management, the student record type must be reworked. And node is only the node of the linked list, and has nothing to do with the student record. You can't put nodes directly in the student record structure and should separate them. Based on this, a new struct type needs to be defined to associate the student record with the node so that the student record can be managed with a linked list. such as: See Appendix 3.32 for examples of usage. Listing 3.32 Example of a comprehensive program In summary, although the linked list is more flexible than the array, it is easy to insert and delete nodes in the linked list, but also loses the "random access" capability of the array. If the node is close to the beginning of the list, then accessing it will be fast; if the node is near the end of the list, accessing it will be slow. However, the singly linked list also has the disadvantage that it cannot be "backtracked". When inserting a node into a linked list, you must know the node in front of the inserted node. When you delete a node from the linked list, you must know the knot in front of the deleted node. Point; it is difficult to reverse the list. If it is a doubly linked list, you can solve these problems. Industrial Barcode Scanner,Industrial Qr Code Scanner,Industrial Handheld Barcode Scanner,Industrial Fixed Barcode Scanner ShengXiaoBang(GZ) Material Union Technology Co.Ltd , https://www.sxbgz.com