As we all know, text detection in natural scenes is extremely challenging. This article uses OpenCV and EAST text detector to detect text in natural scenes, including text detection in images and text detection in videos, and a detailed description of its principle and implementation process.
In this tutorial, you will learn how to use the EAST text detector to detect text in natural scenes.
The main purpose of this tutorial is to teach readers to use OpenCV and EAST text detector to detect text.
Operating environment:
EAST text detector requires OpenCV3.4.2 or higher, readers who need it can install OpenCV first.
main content:
The first part of the tutorial analyzes why text detection in natural scenes is so challenging.
Next, briefly discuss the EAST text detector, why it is used, and where the algorithm is new, and attach relevant papers for readers' reference.
Finally, the implementation of Python + OpenCV text detection is provided for readers to use in their own applications.
Why text detection in natural scenes is so challenging
Due to the limitations of lighting conditions, image quality, and non-linear alignment of targets, text detection tasks in natural scenes are more difficult
The task of text detection in a constrained controlled environment can usually be accomplished using heuristic-based methods, such as using gradient information or text is usually presented in paragraphs, and characters are generally arranged in a straight line.
But text detection in natural scenes is different and more challenging.
Due to the popularity of cheap digital cameras and smart phones, we need to pay close attention to the conditions when the images are taken. Celine Mancas-Thillou and Bernard Gosselin described the main challenges faced by natural scene text detection in their excellent paper "Natural Scene Text Understanding" published in 2017:
Image/sensor noise: The sensor noise of handheld cameras is usually higher than that of traditional scanners. In addition, cheap cameras usually intervene in the pixels of the original sensor to produce true colors.
Perspective: The non-parallel viewing angle of the text in the natural scene makes the text more difficult to recognize.
Blur: In uncontrolled environments, text tends to become blurry, especially if the end user's smartphone has insufficient shooting stability, the problem is more obvious.
Lighting conditions: We cannot make any assumptions about the lighting conditions in images of natural scenes. It may be that the flash on the camera may light up in near-dark conditions, or it may saturate the entire image under bright sun conditions.
Resolution: Each image capture device is different, and there may be images taken by cameras with too low resolution.
Non-paper objects: Most (but not all) paper is non-reflective. The text in natural scenes may be reflective, such as logos, signs, etc.
Non-planar target: imagine the text printed on the bottle, the text on the surface of the bottle will be distorted and deformed. Although we can still easily "detect" and read the text ourselves, the algorithm will be very difficult to do. We need use cases that can handle this situation.
Processing conditions are unknown: we cannot use any prior information to provide algorithms with "clues" about the location of the text.
OpenCV'sEAST text detector can even recognize text in blurred images
EAST deep learning text detector
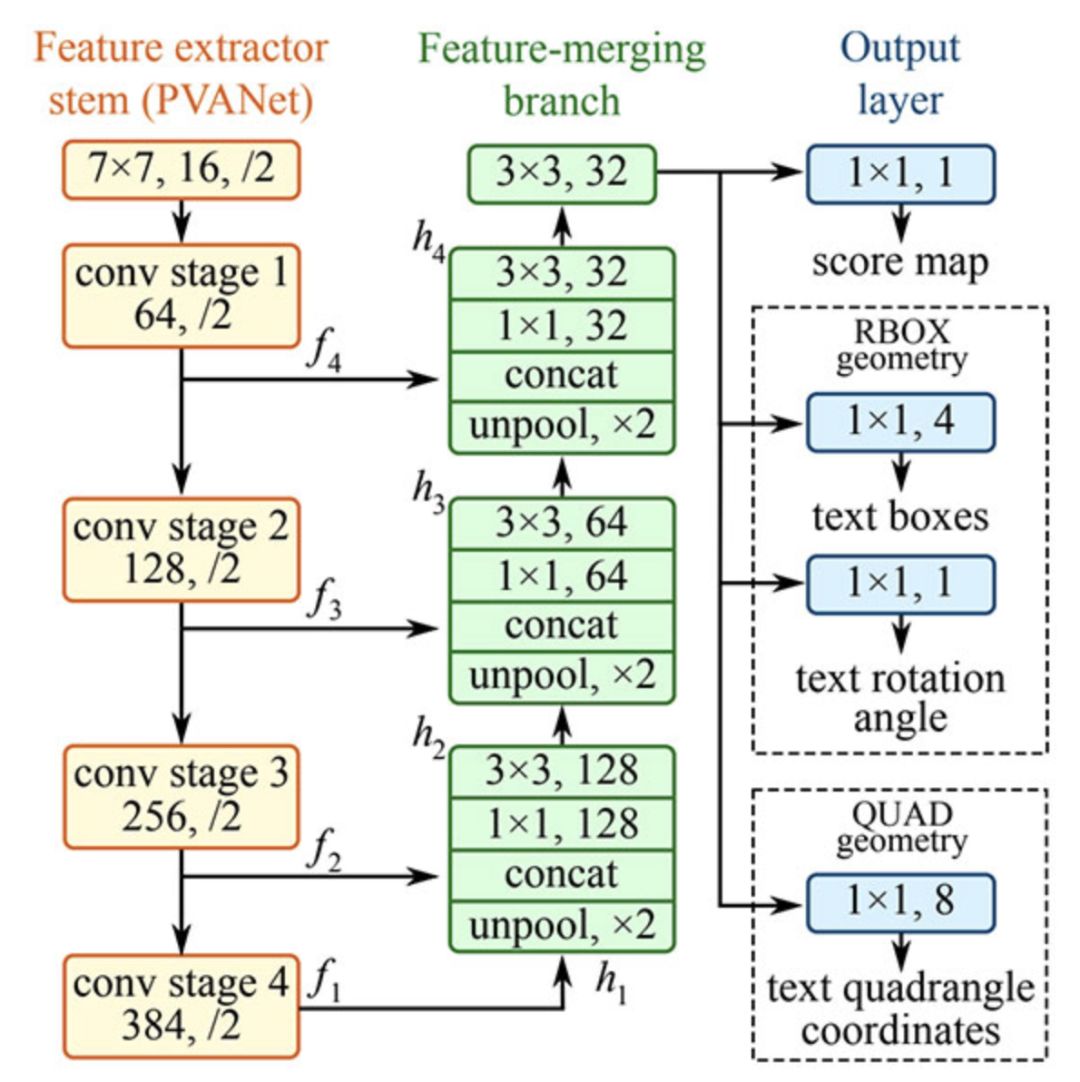
EAST text detector full convolutional network structure
EAST is a text detector based on deep learning, that is, efficient and accurate scene text detection (Efficient and AccurateSceneText detection pipeline). More importantly, the deep learning model is end-to-end, so it may bypass the computationally expensive sub-algorithms used by general text recognizers, such as candidate object aggregation and vocabulary segmentation.
Project structure
First use the Tree terminal command to browse the project structure:
1$tree--dirsfirst 2. 3├──images 4│├──car_wash.png 5│├──lebron_james.jpg 6│└──sign.jpg 7├──frozen_east_text_detection.pb 8├──text_detection. py 9└──text_detection_video.py10111directory,6files
There are three sample pictures in the images/ directory, and readers can add more pictures by themselves.
We use two .py files:
text_detection.py: Detect text in static images
text_detection_video.py: Detect text in webcam or input image file
Both scripts use the EAST model (frozen_east_text_detection.pb)
Precautions
The examples introduced in this article are based on the official C++ examples of OpenC++V. Some problems may be encountered during the conversion to Python.
For example, there are no Point2f and RotatedRect functions in Python, so the implementation in the C++ environment cannot be fully reproduced.
Secondly, the NMSBoxes function does not return any value bound to Python, which eventually causes OpenCV to report an error. The NMSBoxes function can be used in OpenCV3.4.2, but I cannot test it in detail.
Use OpenCV to realize the construction of text detector
Before starting, I would like to point out again that you need to install OpenCV 3.4.2 (or OpenCV 4) on your system at least to use OpenCV's EAST text detector, so if you have not installed OpenCV 3.4.2 or later, please Refer to the OpenCV installation guide below.
Next, install or upgrade imutils in your system.
1$pipinstall--upgradeimutils
At this point, the system settings have been completed, open text_detection.py and enter the following code:
1#importthenecessarypackages 2fromimutils.object_detectionimportnon_max_suppression 3importnumpyasnp 4importargparse 5importtime 6importcv2 7 8#constructtheargumentparserandparsethearguments 9ap=argparse.ArgumentParser()10ap.add_argument("-i","--"inputargument=str "-east","--east",type=str,13help="pathtoinputEASTtextdetector")14ap.add_argument("-c","--min-confidence",type=float,default=0.5,15help="minimumprobabilityrequiredtoinspectaregion ")16ap.add_argument("-w","--width",type=int,default=320,17help="resizedimagewidth(shouldbemultipleof32)")18ap.add_argument("-e","--height",type =int,default=320,19help="resizedimageheight(shouldbemultipleof32)")20args=vars(ap.parse_args())
First, we import the required packages and modules on lines 2-6. Note that we import NumPy, OpenCV and non_max_suppression implementations from imutils.object_detection.
Then we continue to parse the five command line parameters on lines 9-20:
--image: The path of the input image.
--east: EAST scene text detector model file path.
--min-confidence: Determine the probability threshold of the text. Optional, default value = 0.5.
--width: adjusted image width-must be a multiple of 32. Optional, default value = 320.
--height: The height of the adjusted image-must be a multiple of 32. Optional, default value = 320.
Important note: EAST text requires the input image size to be a multiple of 32, so if you choose to adjust the width and height of the image, please make sure that these two values ​​are multiples of 32!
Then load the image and resize:
22#loadtheinputimageandgrabtheimagedimensions23image=cv2.imread(args["image"])24orig=image.copy()25(H,W)=image.shape[:2]2627#setthenewwidthandheightandthendeterminetheratioinchange28#forboththewidthandheight29(newW,newH)=(args "width"],args["height"])30rW=W/float(newW)31rH=H/float(newH)3233#resizetheimageandgrabthenewimagedimensions34image=cv2.resize(image,(newW,newH))35(H,W) =image.shape[:2]
Lines 23 and 24 load and copy the input image.
Lines 30 and 31 determine the ratio of the original image size to the new image size (based on the command line parameters provided for --width and --height).
Then we resize the image, ignoring the aspect ratio (line 34).
In order to perform text detection using OpenCV and the EAST deep learning model, we need to extract two layers of output feature maps:
37#definethetwooutputlayernamesfortheEASTdetectormodelthat38#weareinterested--thefirstistheoutputprobabilitiesandthe39#secondcanbeusedtoderivetheboundingboxcoordinatesoftext40layerNames=[41"feature_fusion/Conv_7/Sigmoid",42"feature_fusion/concat_3"]
We constructed a table of layerNames on lines 40-42:
The first layer is our output sigmoid activation, which gives the probability of a region containing text or not containing text.
The second layer is an output feature map that represents the "geometry" of the image. We use it to derive the bounding box coordinates of the text in the input image.
Load OpenCV's EAST text detector:
44#loadthepre-trainedEASTtextdetector45print("[INFO]loadingEASTtextdetector...")46net=cv2.dnn.readNet(args["east"])4748#constructablobfromtheimageandthenperformaforwardpassof49#themodeltoobtainthetwooutputlayersets50blob=cv2.dnn.blob,(Image(Image) H),51(123.68,116.78,103.94),swapRB=True,crop=False)52start=time.time()53net.setInput(blob)54(scores,geometry)=net.forward(layerNames)55end=time. time()5657#showtiminginformationontextprediction58print("[INFO]textdetectiontook{:.6f}seconds".format(end-start))
We use cv2.dnn.readNet to load the neural network into memory by passing the path to the EAST detector as a parameter in line 46.
Then we prepare our image by converting it into blobs on line 50 and line 51. To learn more about this step, see Deep Learning: How OpenCV's blobFromImage works.
To predict the text, we can simply set the blob as input and call net.forward (lines 53 and 54). These lines are surrounded by the crawl timestamp so that we can print the elapsed time on line 58.
By providing layerNames as a parameter to net.forward, we instruct OpenCV to return the two feature maps we are interested in:
The output geometry is used to export the bounding box coordinates of the text in the input image
Similarly, the score map contains the probability of a given area of ​​text:
We need to loop through these values ​​one by one:
60 # grabthenumberofrowsandcolumnsfromthescoresvolume, then61 # initializeoursetofboundingboxrectanglesandcorresponding62 # confidencescores63 (numRows, numCols) = scores.shape [2: 4] 64rects = [] 65confidences = [] 6667 # loopoverthenumberofrows68foryinrange (0, numRows): 69 # extractthescores (probabilities), followedbythegeometrical70 # datausedtoderivepotentialboundingboxcoordinatesthat71 #surroundtext72scoresData=scores[0,0,y]73xData0=geometry[0,0,y]74xData1=geometry[0,1,y]75xData2=geometry[0,2,y]76xData3=geometry[0,3,y ]77anglesData=geometry[0,4,y]
We first grab the dimension of score (line 63), and then initialize two lists:
rects: Store the bounding box (x, y) coordinates of the text area
Confidence: Store the probability associated with each bounding box
We will use non-maximasuppression for these areas later.
Start the loop on line 68.
Lines 72-77 extract the score and geometric data y of the current line.
Next, we traverse each column index of the currently selected row:
79#loopoverthenumberofcolumns 80forxinrange(0,numCols): 81#ifourscoredoesnothavesufficientprobability,ignoreit 82ifscoresData[x]
For each row, we start looping through the 80th row column.
We need to filter weak text detection by ignoring areas with low probability (lines 82 and 83).
When the image passes through the network, the EAST text detector naturally reduces the volume size-our volume is actually 4 times smaller than the input image, so we multiply it by 4 to return the coordinates to the original image.
I have included how to extract the angle data in lines 91-93; however, as I mentioned in the previous section, you cannot construct a rotating bounding box like in C++-if you want to handle this task, Then starting from the perspective of line 91 will be your first step.
Lines 97-105 derive the border coordinates of the text area.
Then we update the rects and confi database lists (lines 109 and 110) respectively.
The final step is to apply non-maximum suppression to our bounding box to suppress weakly overlapping bounding boxes, and then display the resulting text prediction:
112#applynon-maximasuppressiontosuppressweak,overlappingbounding113#boxes114boxes=non_max_suppression(np.array(rects),probs=confidences)115116#loopovertheboundingboxes117for(startX,startY,endX,endY)inboxes:118#scaletheboundingthestartX,endY)inboxes:118#scaletheboundingthestartX,endY)inboxes*startX =int(startY*rH)122endX=int(endX*rW)123endY=int(endY*rH)124125#drawtheboundingboxontheimage126cv2.rectangle(orig,(startX,startY),(endX,endY),(0,255,0),2 )127128#showtheoutputimage129cv2.imshow("TextDetection",orig)130cv2.waitKey(0)
As I mentioned in the previous section, I cannot use non-maximum suppression in my OpenCV 4 installation (cv2.dnn.NMSBoxes) because the Python binding does not return a value, which eventually causes OpenCV to error. I can't fully test in OpenCV 3.4.2, so it can run in v3.4.2.
Instead, I used the non-maximum suppression implementation provided in the imutils package (line 114). The results are still good; however, I cannot compare my output with the NMSBoxes function to see if they are the same.
Lines 117-126 loop through the bounding box, scale the coordinates to the original image size, and draw the output to the orig image. Until a button is pressed, the original image will be displayed (line 129-130).
One thing to note in the last experiment is that our two nested for loops are used to loop the scores and geometry volume on lines 68-110. This is a good example of how you can use Cython to greatly speed up The speed of the pipeline. I have used OpenCV and Python to demonstrate the powerful function of Cython in quickly optimizing the "for" pixel loop.
OpenCV text detector results
You can execute the following commands in the terminal (note the two command line parameters):
1$pythontext_detection.py--imageimages/lebron_james.jpg\2--eastfrozen_east_text_detection.pb3[INFO]loadingEASTtextdetector...4[INFO]textdetectiontook0.142082seconds
The result should look like the image below:
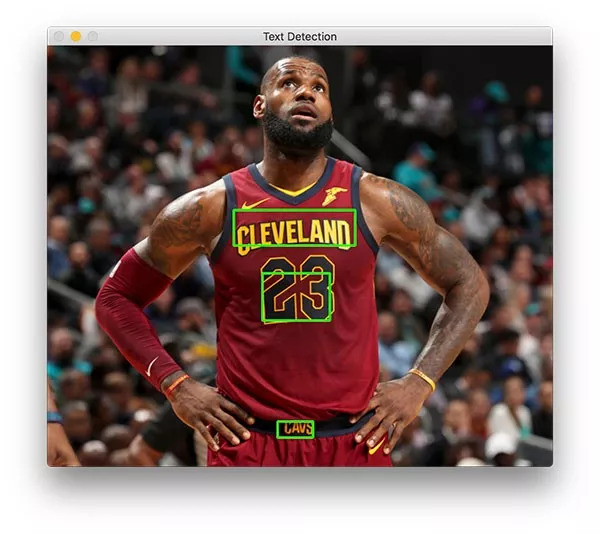
The text detector successfully recognized the text on the basketball superstar LeBron James' jersey
There are three text areas on James.
Now let's try to detect the text of the business logo:
1$pythontext_detection.py--imageimages/car_wash.png\2--eastfrozen_east_text_detection.pb3[INFO]loadingEASTtextdetector...4[INFO]textdetectiontook0.142295seconds
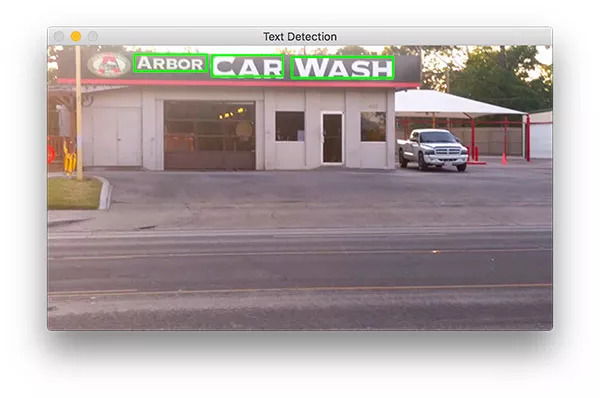
Use the EAST text detector to easily identify the sign text of the roadside car wash shop
Finally, we will try a road sign:
1$pythontext_detection.py--imageimages/sign.jpg\2--eastfrozen_east_text_detection.pb3[INFO]loadingEASTtextdetector...4[INFO]textdetectiontook0.141675seconds
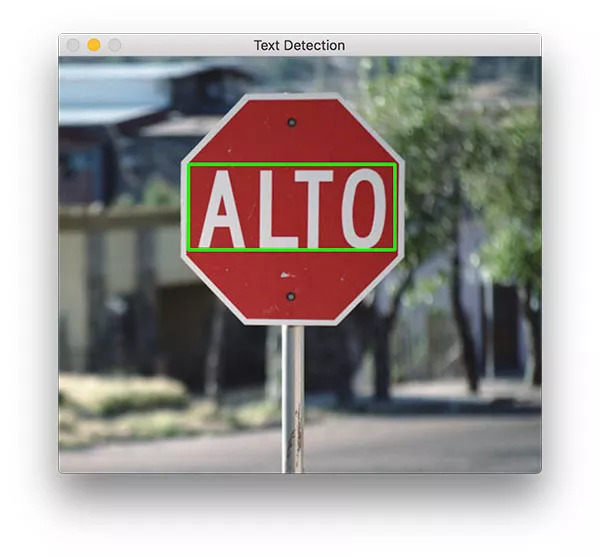
The scene text detector and EAST text detector based on Python and OpenCV successfully detected parking signs in Spanish
The scene contains a Spanish stop sign. "ALTO" can be accurately recognized by OpenCV and EAST.
As you know, EAST is very accurate and relatively fast, taking about 0.14 seconds per image on average.
OpenCV for text detection in video
Based on the above work, we can further use OpenCV for text detection in videos.
Open text_detection_video.py, and insert the following code:
1#importthenecessarypackages2fromimutils.videoimportVideoStream3fromimutils.videoimportFPS4fromimutils.object_detectionimportnon_max_suppression5importnumpyasnp6importargparse7importimutils8importtime9importcv2
First, we import some packages. We will use VideoStream to access the webcam and use FPS to test the number of frames per second for this script. The other content is the same as the previous section.
For convenience, define a new function to decode our prediction function-it will be reused for each frame and make the loop clearer:
11defdecode_predictions(scores,geometry):12#grabthenumberofrowsandcolumnsfromthescoresvolume,then13#initializeoursetofboundingboxrectanglesandcorresponding14#confidencescores15(numRows,numCols)=scores.shape[2:4]16#grabthenumberofrowsandcolumnsfromthescoresvolume. (probabilities),followedbythe22#geometricaldatausedtoderivepotentialboundingbox23#coordinatesthatsurroundtext24scoresData=scores[0,0,y]25xData0=geometry[0,0,y]26xData1=geometry[0,1,y]27xData2=geometry[0,1,y]28xData2,y]28xData2 geometry[0,3,y]29anglesData=geometry[0,4,y]3031#loopoverthenumberofcolumns32forxinrange(0,numCols):33#ifourscoredoesnothavesufficientprobability,34#ignoreit35ifscoresData[x]
In line 11, we define the decode_prediction function. This function is used to extract:
The bounding box coordinates of the text area;
Probability of text area detection.
This dedicated function will make the code easier to read and manage.
Let's parse the command line parameters:
68#constructtheargumentparserandparsethearguments69ap=argparse.ArgumentParser()70ap.add_argument("-east","--east",type=str,required=True,71help="pathtoinputEASTtextdetector")72ap.add_argument("-v","-- video",type=str,73help="pathtooptinalinputvideofile")74ap.add_argument("-c","--min-confidence",type=float,default=0.5,75help="minimumprobabilityrequiredtoinspectaregion")76ap.add_argument("- w","--width",type=int,default=320,77help="resizedimagewidth(shouldbemultipleof32)")78ap.add_argument("-e","--height",type=int,default=320,79help ="resizedimageheight(shouldbemultipleof32)")80args=vars(ap.parse_args())
The command line parameter analysis in 69-80 lines of code:
--east: EAST scene text detector model file path.
--video: The path of the input video (optional). If a video path is provided, the webcam will not be used.
--Min-confidence: Determine the probability threshold of the text (optional). default=0.5.
--width: Adjust the image width (must be a multiple of 32, optional). default=320.
--Height: Adjust the image height (must be a multiple of 32, optional). default=320.
The difference from the image-only script in the previous section (in terms of command-line parameters) is that the image parameters are replaced with video.
Next, we will carry out important initialization work:
82#initializetheoriginalframedimensions,newframedimensions,83#andratiobetweenthedimensions84(W,H)=(None,None)85(newW,newH)=(args["width"],args["height"])86(rW,rH)=( None,None)8788#definethetwooutputlayernamesfortheEASTdetectormodelthat89#weareinterested--thefirstistheoutputprobabilitiesandthe90#secondcanbeusedtoderivetheboundingboxcoordinatesoftext91layerNames=[92"feature_fusion/Conv_7/Sigmoid",93"feature_fusion/context_detectorprint-EAST"detector96",93"east cv2.dnn.readNet(args["east"])
The height, width, and ratio initialization on lines 84-86 will allow us to scale the bounding box appropriately later.
We defined the name of the output layer and loaded the pre-trained EAST text detector on lines 91-97.
The following code sets up our video stream and frames per second counter:
99#ifavideopathwasnotsupplied,grabthereferencetothewebcam100ifnotargs.get("video",False):101print("[INFO]startingvideostream...")102vs=VideoStream(src=0).start()103time.sleep(1.0)104105#otherwise,grabareferencetothevideofile106else :107vs=cv2.VideoCapture(args["video"])108109#starttheFPSthroughputestimator110fps=FPS().start()
Our video stream is set to:
A camera (100-103 lines)
Or a video file (line 106-107)
We initialize the frame per second counter on line 110 and start looping incoming frames:
112#loopoverframesfromthevideostream113whileTrue:114#grabthecurrentframe,thenhandleifweareusinga115#VideoStreamorVideoCaptureobject116frame=vs.read()117frame=frame[1]ifargs.get("video",False)elseframe118119#checktoseeifwehavereachedtheendofthestream120ifframemainsizeframeresize=resize:121123 =1000)125orig=frame.copy()126127#ifourframedimensionsareNone,westillneedtocomputethe128#ratioofoldframedimensionstonewframedimensions129ifWisNoneorHisNone:130(H,W)=frame.shape[:2]131rW=W/float(newW)134lorH=H/float(newW)134lorH=H/ resizetheframe,thistimeignoringaspectratio135frame=cv2.resize(frame,(newW,newH))
We start looping on the video/camera frame from line 113.
Our frame has been resized to maintain the aspect ratio (line 124). Get the dimensions from lines 129-132 and calculate the ratio. Then we adjust the frame size again (must be a multiple of 32), this time ignoring the aspect ratio, because we have stored the ratio for safe keeping (line 135).
Reasoning and drawing the border of the text area occurs in the following lines:
137#constructablobfromtheframeandthenperformaforwardpass138#ofthemodeltoobtainthetwooutputlayersets139blob=cv2.dnn.blobFromImage(frame,1.0,(newW,newH),140(123.68,116.78,103.94),swapRB=True,crop=cores,141net.sets(blob)geometry(blob) )=net.forward(layerNames)143144#decodethepredictions,thenapplynon-maximasuppressionto145#suppressweak,overlappingboundingboxes146(rects,confidences)=decode_predictions(scores,geometry)147boxes=non_max_suppression(np.array(#150confidence)forloopingboxes=150confidence(np.for startX,startY,endX,endY)inboxes:151#scaletheboundingboxcoordinatesbasedontherespective152#ratios153startX=int(startX*rW)154startY=int(startY*rH)155endX=int(endX*rW)156endY=int(endY*rH)157158#drawtheboundingboxontheframe159c rectangle(orig,(startX,startY),(endX,endY),(0,255,0),2)
In this code block:
Create a blob and pass the text area through the network (lines 139-142);
Decode the prediction and apply NMS (lines 146 and 147). Use the decode_forecasts function and imutils non_max_suppression function defined in this script before.
Loop the bounding boxes and draw them on the frame (lines 150-159). This involves scaling the box by the ratio collected earlier.
Then we will close the frame processing loop and the script itself:
161#updatetheFPScounter162fps.update()163164#showtheoutputframe165cv2.imshow("TextDetection",orig)166key=cv2.waitKey(1)&0xFF167168#ifthe`q`keywaspressed,breakfromtheloop169ifkey==ord("q"):170breakingdisplayFPS#stopthetimeranddisplayFPS ()174print("[INFO]elaspedtime:{:.2f}".format(fps.elapsed()))175print("[INFO]approx.FPS:{:.2f}".format(fps.fps() ))176177#ifweareusingawebcam,releasethepointer178ifnotargs.get("video",False):179vs.stop()180181#otherwise,releasethefilepointer182else:183vs.release()184185#closeallwindows186cv2.destroyAllWindows()
We update the fps counter (line 162) in each iteration of the loop so that we can calculate and display the timing when we exit the loop (lines 173-175).
We show the output of EAST text detection on line 165 and handle the key press (lines 166-170). If the "q" key stands for "exit" and is pressed, we will break out of the loop and continue to clean up and release the pointer.
Video text detection result
To use OpenCV to perform text detection on videos, please be sure to click the "download content" link at the bottom of this article to obtain the corresponding resources.
Then, open the terminal and execute the following command (it will turn on the camera, because the command line parameter does not provide--video):
1$pythontext_detection_video.py--eastfrozen_east_text_detection.pb2[INFO]loadingEASTtextdetector...3[INFO]startingvideostream...4[INFO]elaspedtime:59.765[INFO]approx.FPS:8.85
Shenzhen Kate Technology Co., Ltd. , https://www.katevape.com